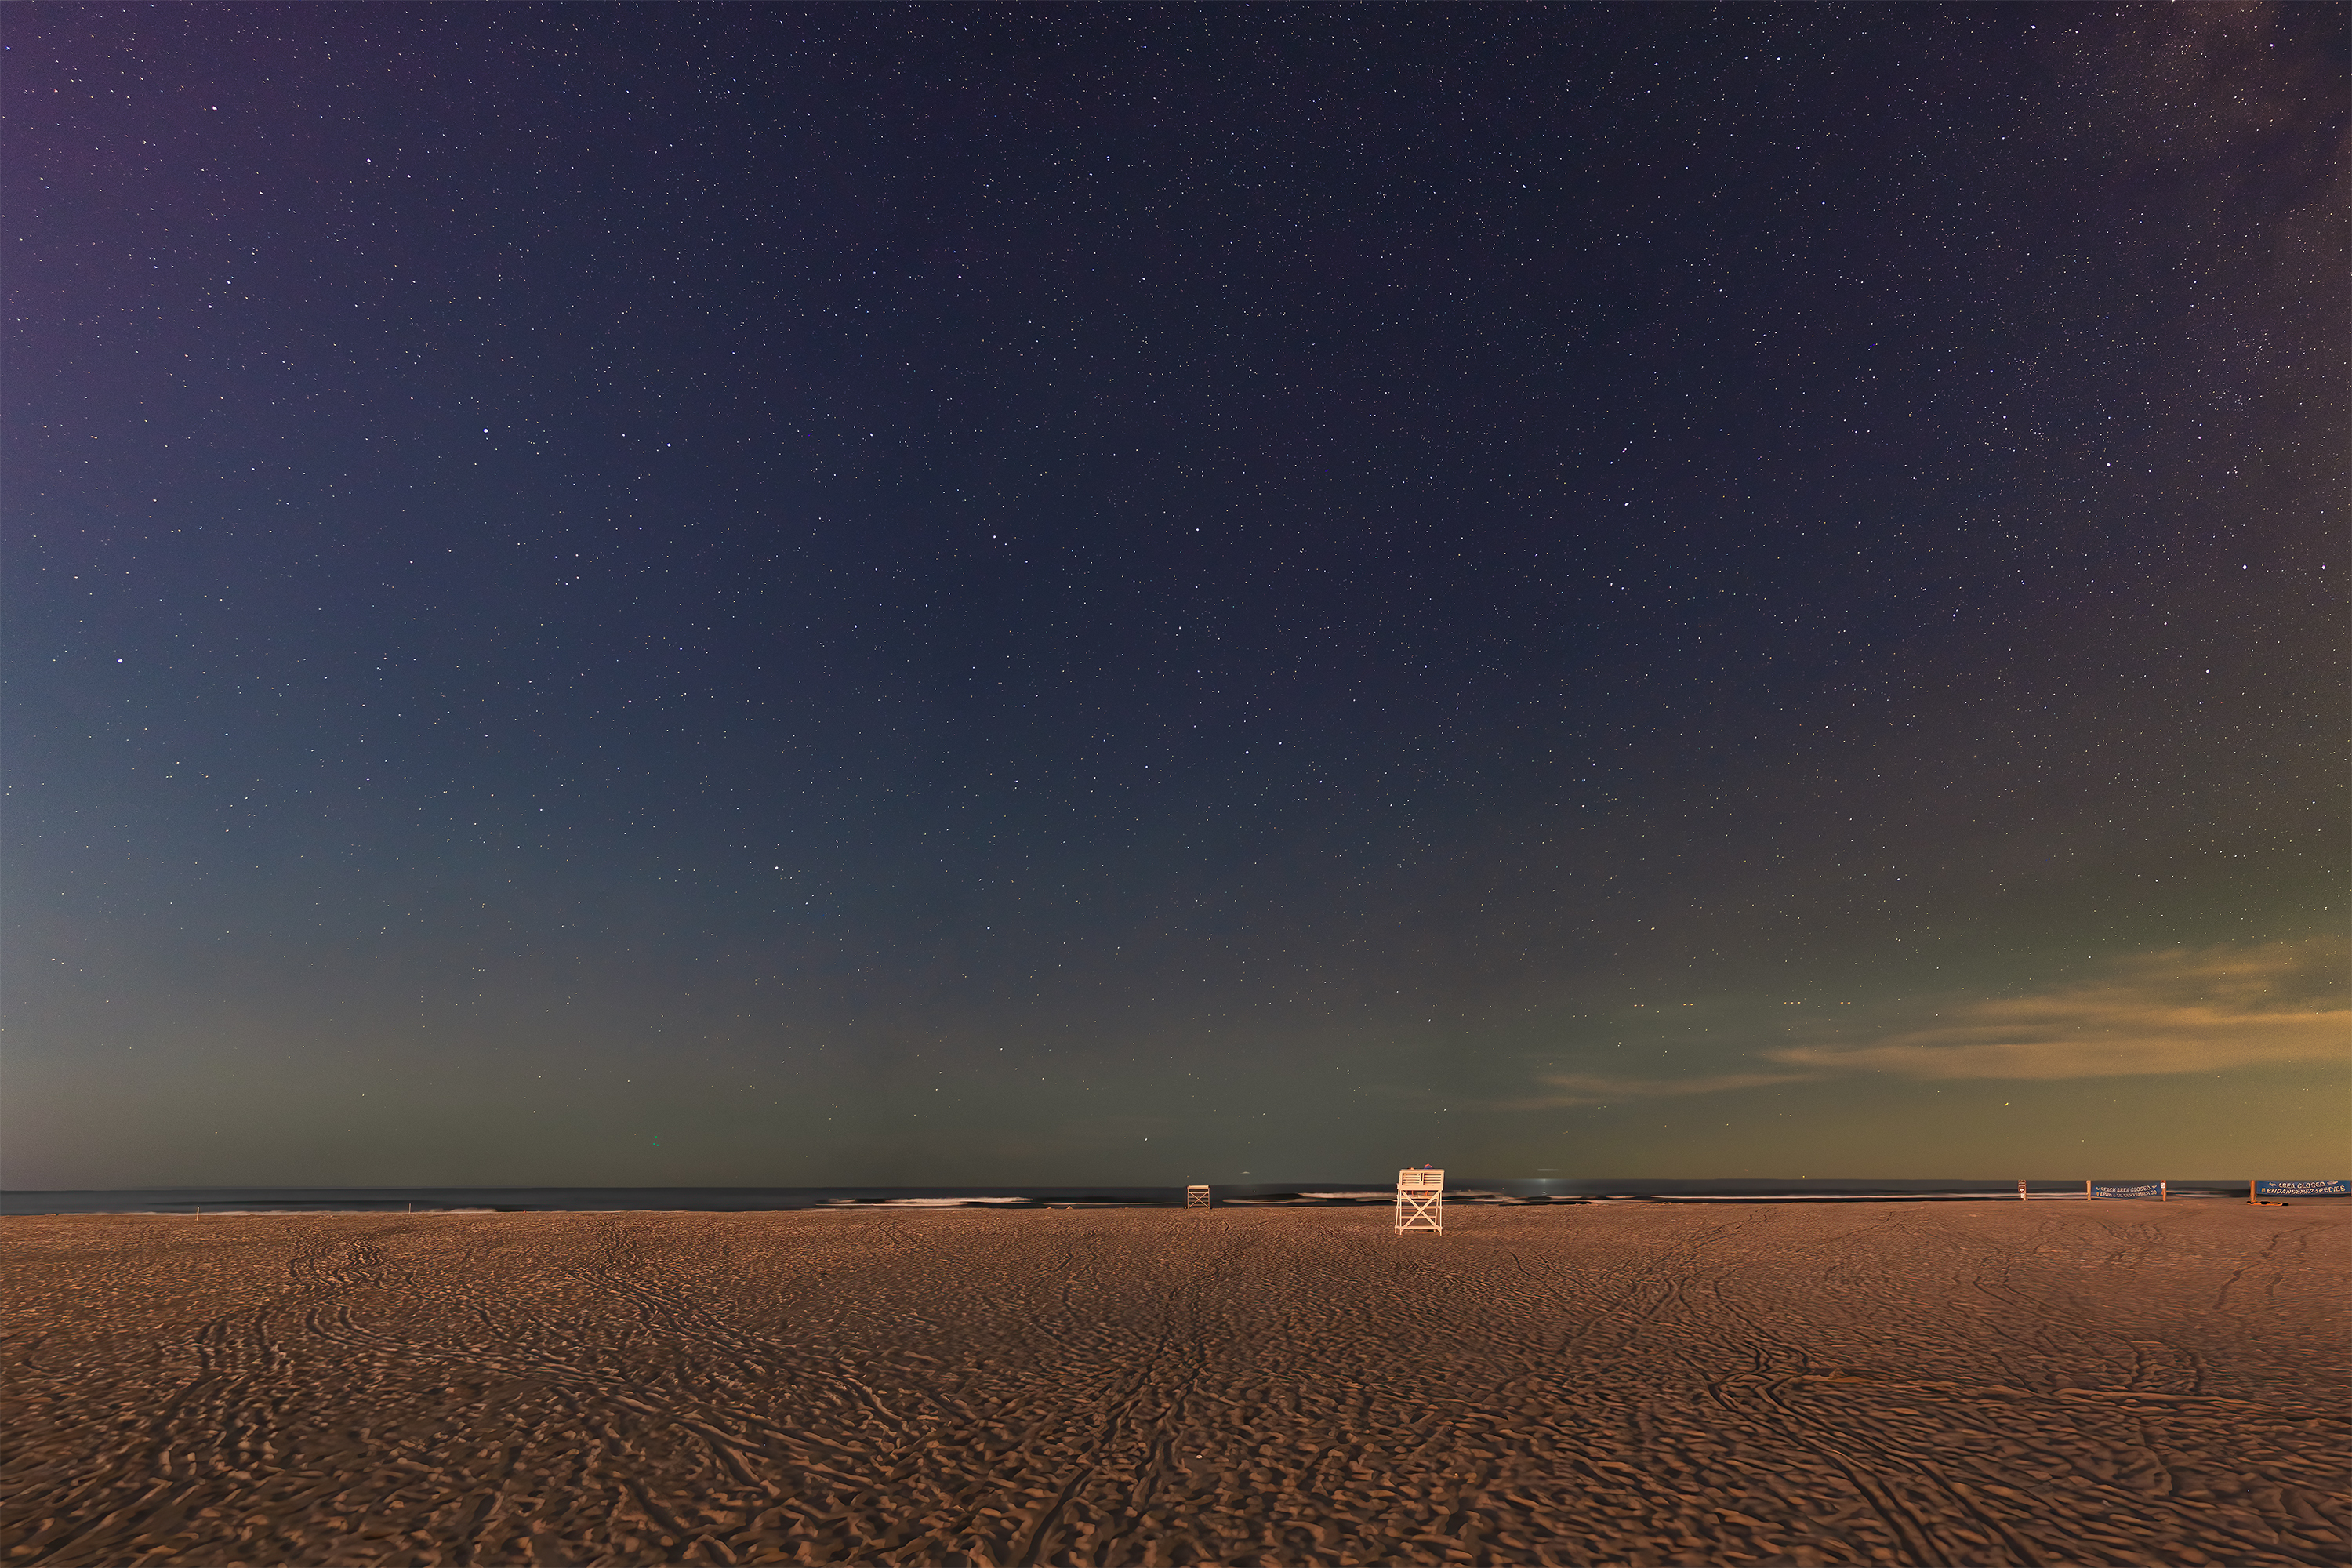
I recently went on a beach holiday in Wildwood, New Jersey. We all love the beach and it’s also the greatest place to shoot night sky photography in the northeast. A Jersey beach is not perfect for night sky photographers; it isn’t the Utah desert or even a remote part of Pennsylvania, but my camera was aimed out into the Atlantic Ocean where the sky is deep dark. To understand just how dark the beach was, I can provide this example. My exposures on the beach were 10 sec, ISO 3200, and f1.4. In contrast, in my light polluted backyard 14 miles from New York City, I’ve done this same type of photograph and in that case it’s 3 secs, ISO 800, and f1.4. That’s a 3.5-4 stop difference in darkness. With that much darkness, a lot more detail comes through on a longer exposure.
This photo is a panorama. It’s actually 6 photos taken with 3 in 1 row of the sky and 3 in another row of the ground. You can see how the photos are stitched together below in my panorama stitching app, PT GUI. On top of that, each panel also consists of 5 stacked photos to reduce noise which I did in Starry Landscape Stacker. This means I took 30 photos in total.

While this is by far not an award-winning photo (it doesn’t even have the Milky Way in it), I’m proud of it. I’m hoping it will be the first of many to come. I wanted to share how I did this including the tools I used and the resources I found online that helped me along the way.
How do you do a panorama?
Believe it or not, panoramas are difficult. They are not as easy as your iPhone makes it. This becomes especially true when you do multi-row panoramas which means shooting a pano of 6 photos with 3 above and 3 below, which is what I did with this photo.
The Parallax Issue
Panos can suffer from something called parallax especially if there is a foreground object. Parallax happens because in each picture (from left to right) that you take for a panorama, the relationship between the foreground and background objects have the appearance of moving or not being in the same place. I won’t be getting deep into what parallax is here, but you can read this great article on F-stoppers about it if you are interested.
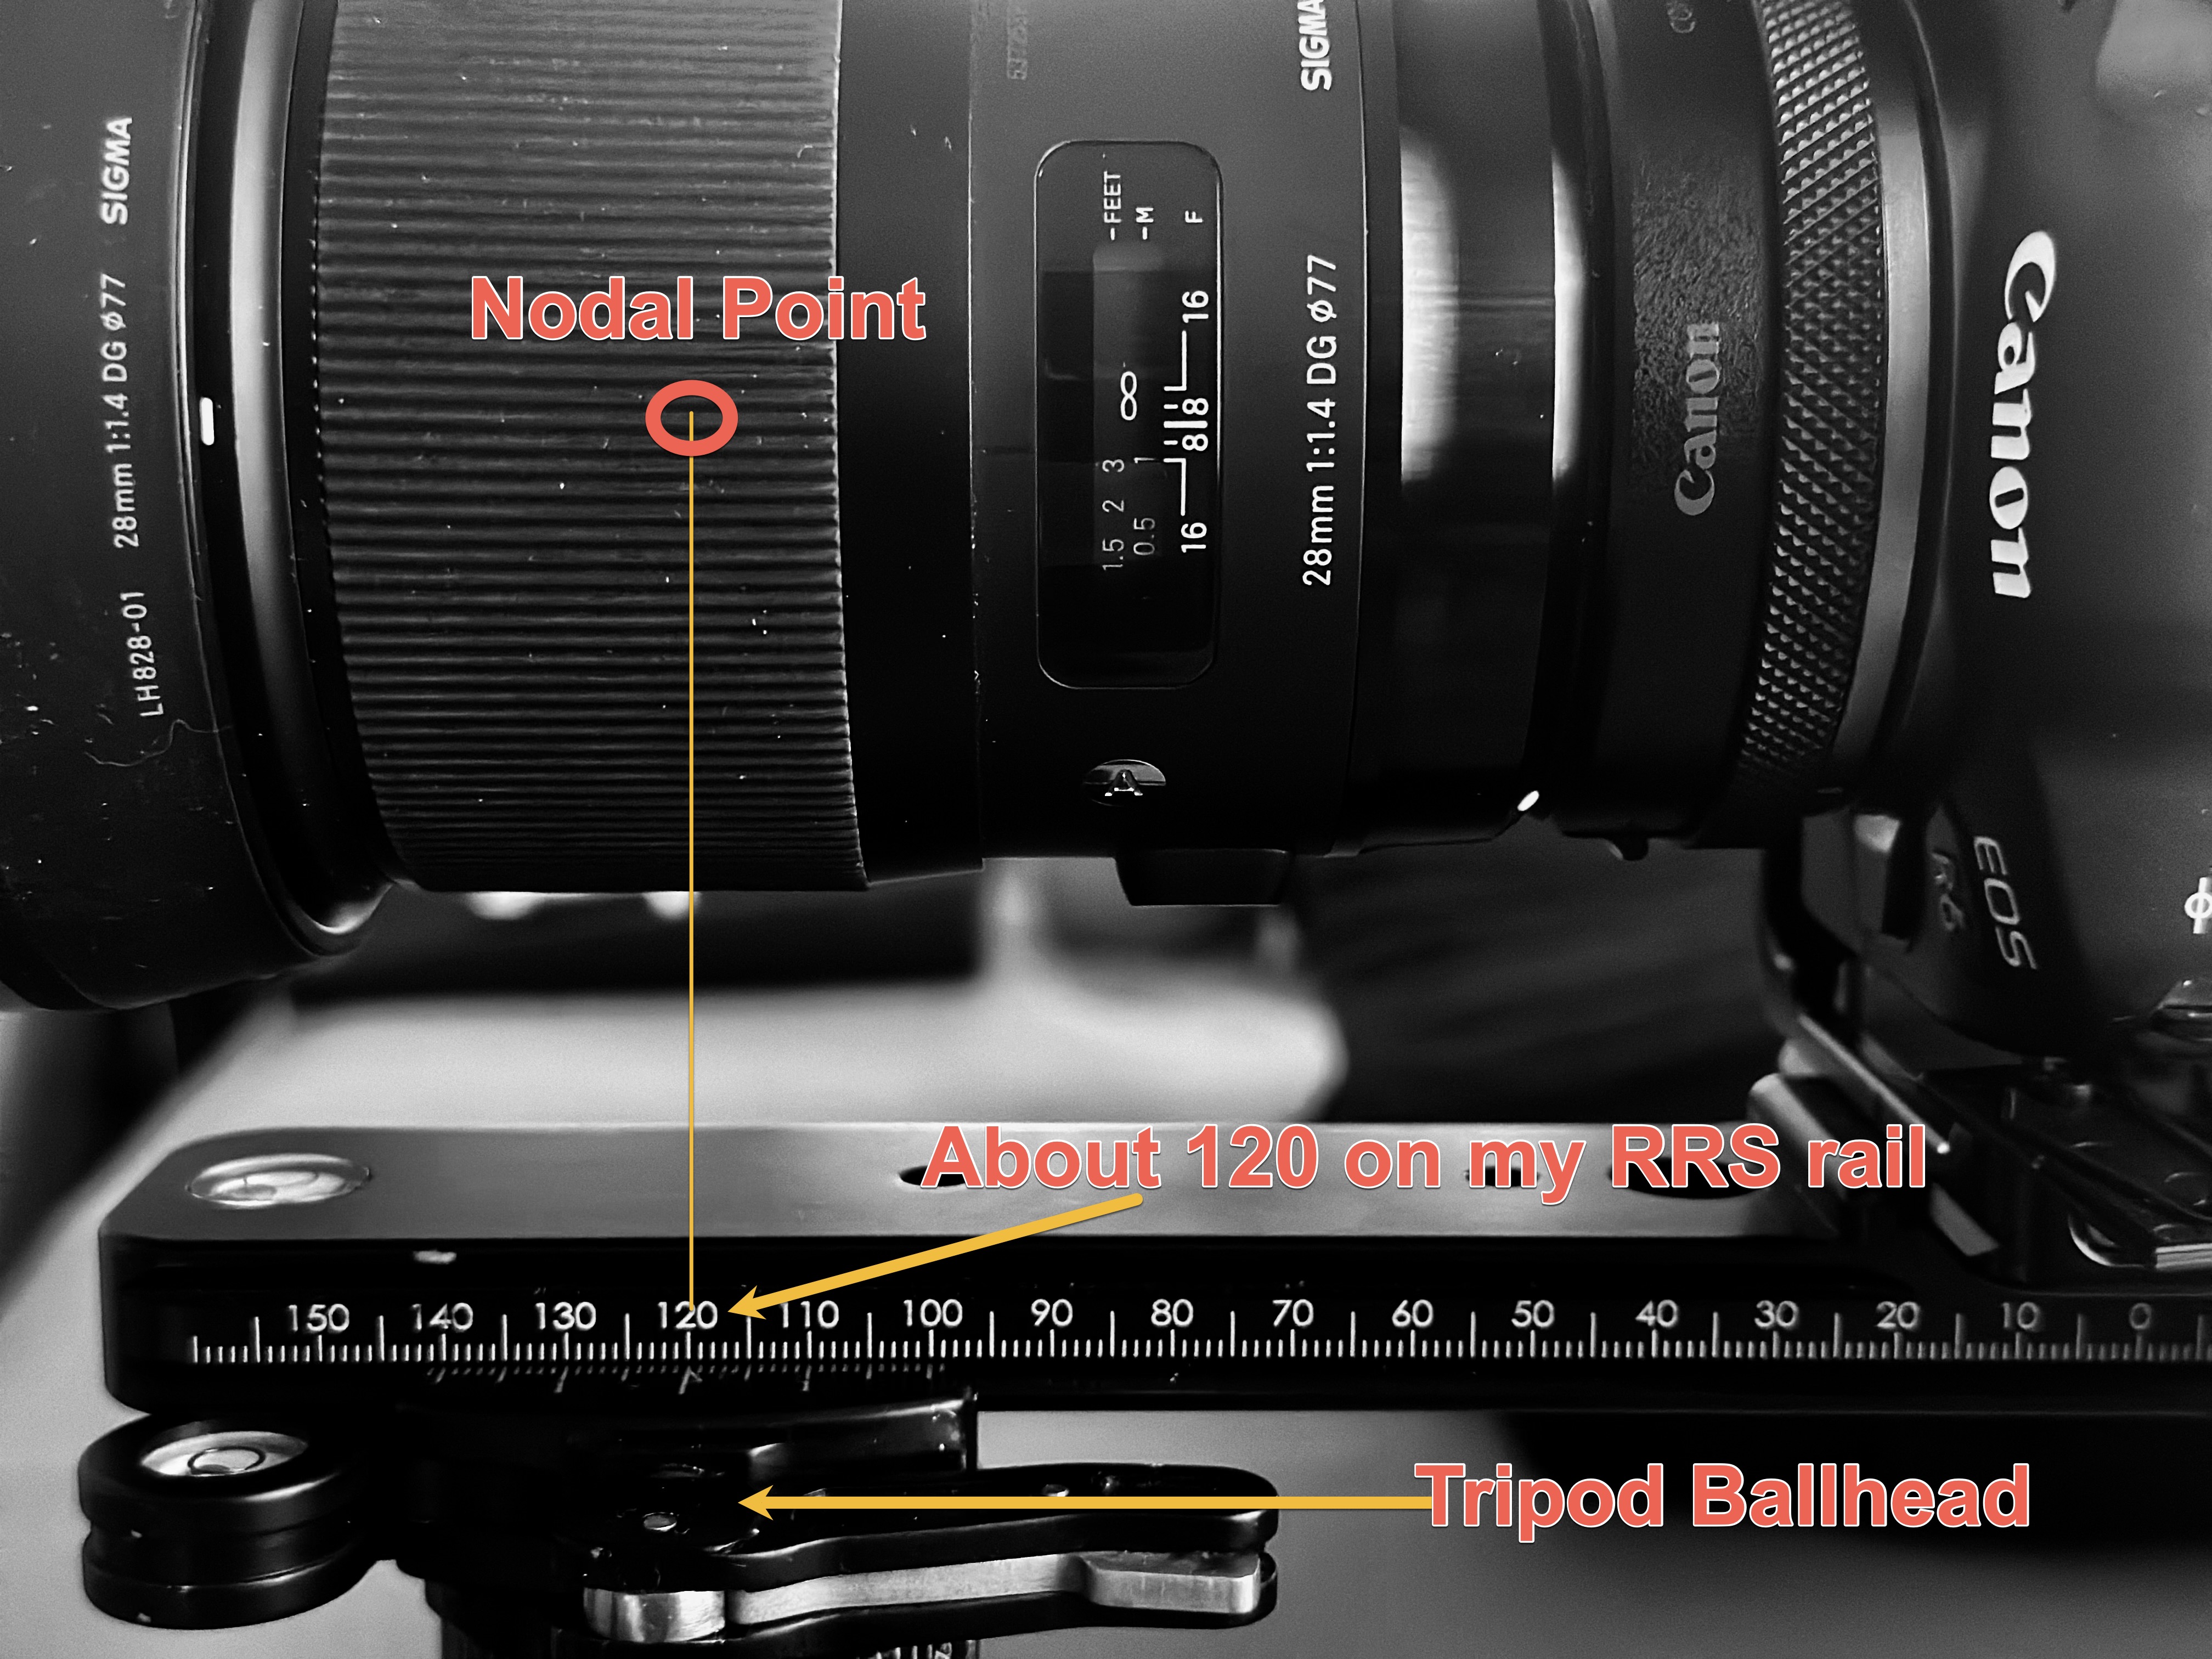
Every camera lens has a “nodal point” or “no parallax point” which is where you will NOT have shifts in subjects in the background relative to your foreground objects when you take multiple photos that will later be stitched together to make a panorama. Simply put, a nodal point is a sweet spot on the lens at which you will experience no parallax when taking multiple photos at different angles as you need to do for a panorama.
Finding the Nodal or “No Parallax” point on your Lens
Unfortunately, finding the nodal point on your lense is a tough process and it usually involves placing 2 light stands. 1 light stand goes in front of you and the other goes a further distance away representing an object in the foreground and background. You then need to move your camera from side to side while looking in your viewfinder to see if the light stand in the back shifts. Hudson Henry has a great video on how to do this. I encourage you to watch it as it really helped me understand how to find the nodal point of my lense. The good news is–you only need to do this once if you are using a prime lens like me.
Using a Nodal Rail
The nodal rail is a rail that has a mounting plate on it to place your camera on. You can then use the rail to move your camera back and forth to position your lens’s nodal point directly above the tripod head. See the image below. You will need one of these if you plan on doing panoramas and you will also need it to find the nodal point as outlined above. I use the Really Right Stuff nodal rail. While it’s expensive, I don’t think I want to hang my camera from a cheap Amazon rail and you probably don’t want to either!
Panorama Heads for Multi-Row Panoramas
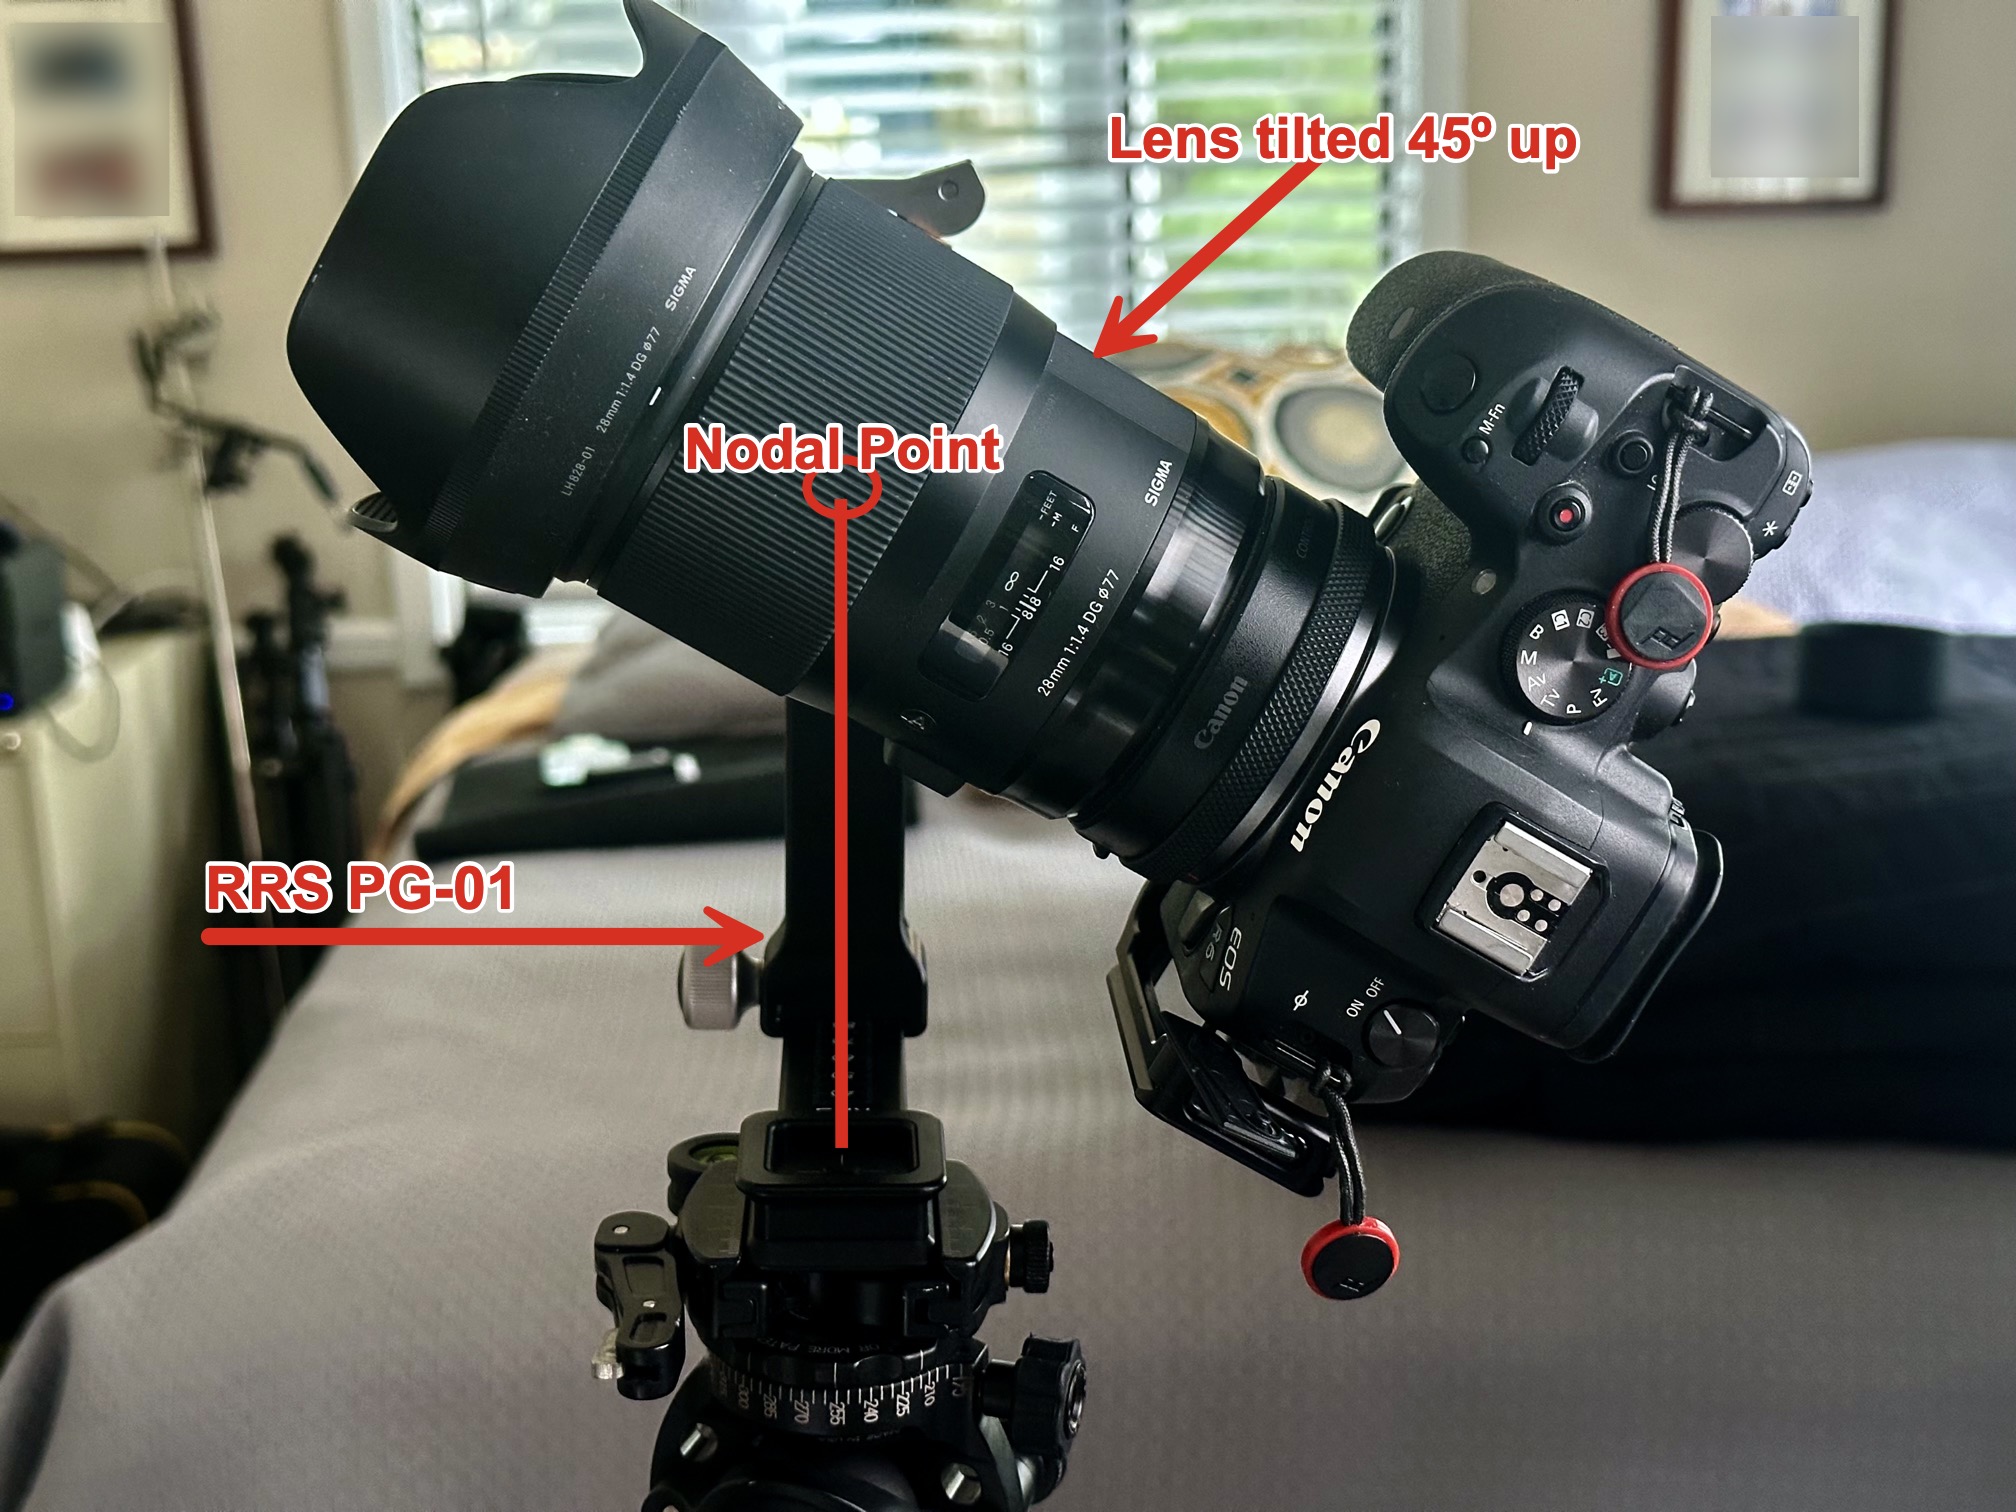
Shooting a single row panorama will require only the nodal rail as pictured above. If you want to do 2 rows of photos as I did in this photo–that requires another piece of equipment called a panorama head. You still need the nodal rail too, so the panorama head doesn’t replace the nodal rail. If you are interested in doing night sky photography, you will likely want to do 2 rows of images. I use the Really Right Stuff PG-01. Again, nothing from RRS is cheap, but it’s worth the investment.
Why do you need a panorama head? Once the nodal point of your lens is positioned over the tripod head, tilting it up or down using your ball head will lose that positioning. To keep the nodal point in place over the tripod head and tilt the camera up for a 2nd row of photos, you need the RRS PG-01.
I recommend you also watch this excellent video from Hudson Henry which explains how to use the nodal rail as well as the RRS PG-01 panorama head to shoot panoramas.
Night Sky Photography Challenges
The Earth’s Movement
To make things more difficult, night sky photography has another challenge. This challenge is due to the required long exposure times at a dark location. The problem with long exposures and night photography is the Earth–it moves and the stars do not move with it. So, as you take your long exposure, the Earth’s movement may blur your stars if the exposure is too long. Lucky for all of us, an app named Photo Pills can give you your maximum exposure time. The wider your lens is, the more exposure time you have. That’s why anything above 35mm will short change you as far as exposure time.
Using Photo Pills
Photo Pills has a lot of useful tools. To figure out your max exposure time, I use the “spot stars” tool. In this tool, I punch in my 28mm f1.4 lens on my Canon R6 with default stars and it says I have a max exposure time of 8.34s using the NPF rule. You can also use the old school “500 rule” which has become less relevant with mirrorless cameras. The 500 rule simply says you divide 500 by your focal length and that gives you the max exposure time. In my case (500 ÷ 28) would be 18s, but again–that rule may not be as relevant with today’s cameras.
Getting Exposure Time Down
In some cases you will need to get that exposure time down, it will be too long. You have 2 options to do that: a faster aperture or a higher ISO. A faster aperture has no compromises except the expensive (and heavy) lens. A higher ISO does have a compromise–it will create more noise. I generally do not like to go above ISO 3200, but will push to 6400 if needed. Below I talk about how to mitigate noise as shooting at high ISOs is inevitable with the night sky photography.
A 3rd Option: A Star Tracker
Before I do that, I want to mention there is a 3rd option. However, it’s difficulty and expense is a game over for most photographers. You can use a star tracker like the MoveShootMove or iOptron Skyguider Pro. These devices move with the Earth allowing you to take long exposures without blurry stars. You simply mount your camera on top and it moves with the Earth during your long exposure.
While a star tracker sounds like a perfect solution, it requires a long process called a polar alignment. The star tracker must be aligned with the North Pole to work each time you go out. To do that, you need to line it up with the star Polaris using it’s built in scope or a laser. Polar alignment needs to be somewhat accurate to avoid blurry stars. Star trackers are expensive and in the case of the Skyguider Pro–a bit heavy. It’s much easier to limit your exposures than to deal with the extra burden of a star tracker. I had the Skyguider Pro a few years ago for my deep sky astrophotography work. It took me quite a while some nights to get the polar alignment right. I would definitely skip this if you can.
Manual Focus and Manual Exposure
It’s impossible to focus on the stars using autofocus. You need to put your lens into manual focus and then focus close to infinity. To do this, zoom in on your camera’s screen to see the stars up closer than they appear. You are then ready to start focusing. Once they get to their smallest size possible (without disappearing), you are focused. This sounds daunting, but it’s actually quite easy.
It’s important that all of your photos have the same exposure or they will not play nicely in your apps. This means you must use manual exposure on your camera to keep the same aperture, shutter speed, and ISO across all photos.
Night Photography, Noise, and Stacking
No matter what your ISO is, noise is common in night sky photography due to the darkness. Increasing the ISO will create more noise which is why it’s always best to keep your ISO value low.
If you must push your ISO up (and you will be in a situation where you do), you can mitigate noise by shooting multiple photos for each panel and stacking them in a Mac App called Starry Landscape Stacker. If you use a PC, there is an app called Sequator that does something similar. Stacking multiple photos lessens noise as noise is random and occurs in random spots on each photo. Stacking them takes the cleanest spots of every photo and eliminates noise as much as possible. I always stack. In the photo above, it was 6 panels and each panel was a 5 photo stack. That means I took 30 photos in total. If my ISO was higher, I may have taken 10 photos each.
Taking multiple photos for 1 panel of your panorama in a 6-panel panorama can be time consuming. It’s also time consuming to process each one in Starry Landscape Stacker. But, if you want to eliminate noise, this is the best way to do it. No amount of noise AI apps can do a better job than stacking.
Software
I’ve touched upon the tools I use for night sky photography which are actually quite a few, but I wanted to summarize them all here:
- Lightroom: I import all my photos into Lightroom after taking a panorama and make adjustments to 1 photo. I then copy the settings for that photo and apply it to all the other photos. I then export all photos to a TIFF format.
- Starry Landscape Stacker: This is the next piece of software in my chain. I bring in each panel stack and stack the panel to 1 final photo for that panel. This means if I do a 6-panel panorama, I need to do this 6 times. In the end, I have 6 photos that I can then bring into my panorama software, PT GUI.
- PT GUI: I stitch together the 6 panels into 1 grand panorama in PT GUI. I will note you do not have to use PT GUI to create a panorama. I love it and I think it works great especially because its specialized software to specifically create panoramas. However, it’s expensive and panoramas can be made in your everyday imaging software like Lightroom, Photoshop, or Luminar Neo. PT GUI has a lot of extras that help correct issues with panoramas, but if you shoot things right, you shouldn’t have an issue in any of the other tools.
- Luminar Neo: This is the last stop, final editing. I love Luminar and Neo is the latest version of their software. I love the ease of the presets and LUTS and the numerous options for editing photos. I used some night sky presets on this to start, but then fine tuned it further using structure, saturation, contrast, etc as well as masking to treat the ground differently than the sky.
In Conclusion
Shooting a night sky panorama is a big to do between the equipment needed, learning how to effectively create panoramas and dealing with the limitations of shooting the night sky. However, it’s rewarding and I’m personally hoping to get out to some dark sky landscapes to do more of this.